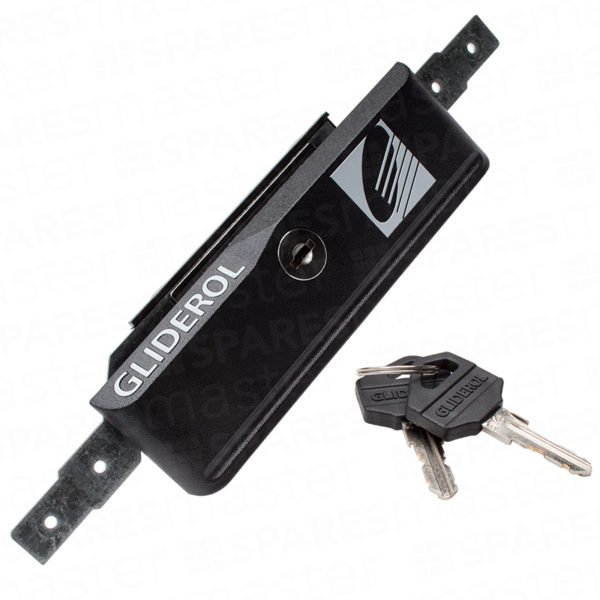
If a door spring is in the way, place the header bracket avove the spring. This is a header bracket replacement kit that is for use with various chamberlain® garage door opener rail assemblies.
Garage Door Header Bracket Installation, Pay attention to a horizontal course of the rail along with the ceiling. Protruding ends of the ceiling fixture can be reduced if necessary. Follow the instructions which will work best for your particular requirements.

Check the manual for your specific model number before ordering to ensure compatibility. Tuesday, december 11, 2018 because of the tremendous torque and tension on them, manufacturer’s specify that connections must be made directly to a 40 mm wood plate (2x lumber, approx 1.5” thick), or using concrete anchors to a masonry wall. (1) header bracket, (1) clevis pin, and (1) ring. The side jambs should hit the bottom of the jamb header you’ve already installed and should be the exact height of your garage door minus 1/4 of an inch (just above the ground) step #5:
Garage Door Opener Installation Guide at The Home Depot
Do not install header bracket over drywall. Use a drill to create holes where they need to be according to the header. If a door spring is in the way, place the header bracket avove the spring. 041a4353 is a header bracket replacement kit that is for use with various garage door opener rail assemblies. Check the manual for your specific model number before ordering to ensure compatibility. Mark this center point just above the door.

Craftsman 20057933 garage door opener parts Sears, Install the header bracket onto that 2x4, and patch the sheetrock hole later. Follow the instructions which apply to your door. The exact location depends on the type of door, but it is usually installed at the door center point. Header bracket, clevis pin, and ring. The side jambs should hit the bottom of the jamb header you’ve already installed.
 The")
Genie Garage Door Opener Header Bracket (35421A.S) The, You can attach the header bracket either to the wall above the garage door, or to the ceiling. Follow the instructions which apply to your door. You can attach the header bracket either to the wall above the garage door, or to the ceiling. This would be the most aesthetic thing to do. Header bracket, clevis pin, and ring.

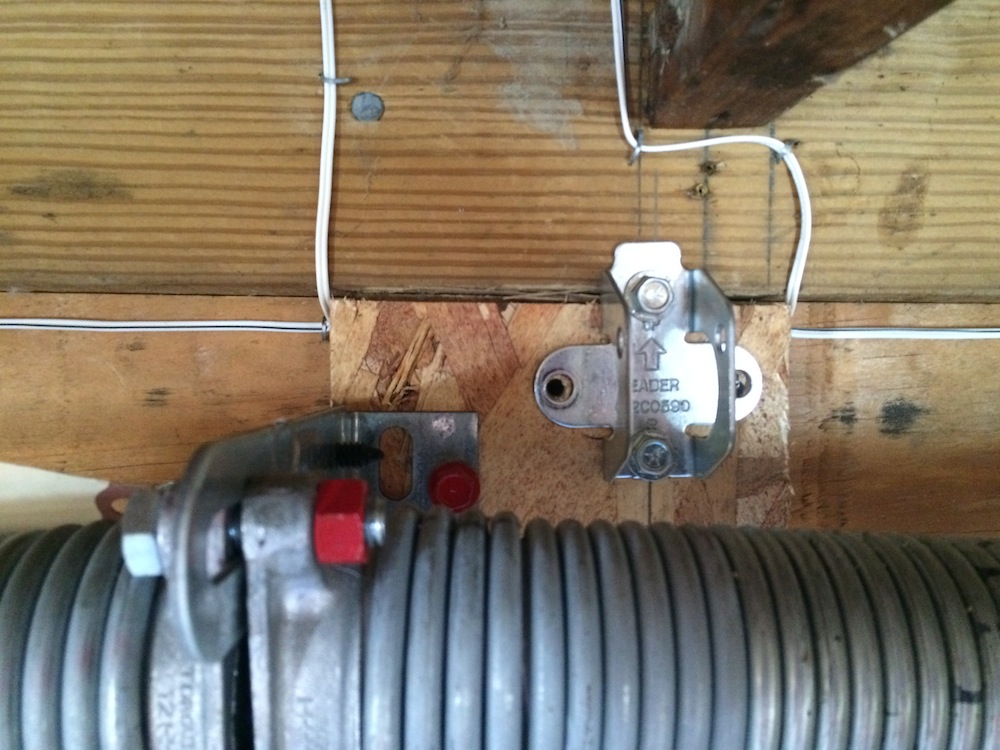
Installing a Center Mount Opener for Your Garage Door, The placement of each bracket has to be precise, and the brackets have to be on exactly the same level on each wall in order for. I would recommend opening the wall and installing a block between the studs. Can the a garage door header bracket and torsion springs be mounted through drywall? Manually lift the garage door to find.

Installing a Garage Door howtos DIY, Install the header bracket onto that 2x4, and patch the sheetrock hole later. Check the manual for your specific model number before ordering to ensure compatibility. The distance can be adjusted by the given hole spacing. Follow the instructions which will work best for your particular requirements. The side jambs should hit the bottom of the jamb header you’ve already.

Ideal Security Universal Replacement Header Roller Bracket, The placement of each bracket has to be precise, and the brackets have to be on exactly the same level on each wall in order for. You need at least 2 rows of wood, to hold up the header on each side, making up 4 studs on each half of the header. • if your door is more than 7.

Installation step 1, Determine header bracket location, The exact location depends on the type of door, but it is usually installed at the door center point. When it comes to installing garage door brackets, measure, measure, measure! Attach the center bracket framing Garage door might not reverse when required. From that highest point, go two inches higher and note that spot with a marker.

The Chamberlain HD950WF Garage Door Opener Review, Attach the center bracket framing Use a drill to create holes where they need to be according to the header. The side jambs should hit the bottom of the jamb header you’ve already installed and should be the exact height of your garage door minus 1/4 of an inch (just above the ground) step #5: Do not install header bracket.

Installing a Garage Door howtos DIY, The exact location depends on the type of door, but it is usually installed at the door center point. Check the manual or replacement parts diagram for specific part information before ordering to ensure compatibility. Follow the instructions which apply to your door. You can attach the header bracket either to the wall above the garage door, or to the.

CRAFTSMAN LIFTMASTER CHAMBERLAIN GARAGE DOOR OPENER HEADER, 041a4353 is a header bracket replacement kit that is for use with various garage door opener rail assemblies. Pay attention to a horizontal course of the rail along with the ceiling. If the door hits the rail, raise the header bracket. Check the manual or replacement parts diagram for specific part information before ordering to ensure compatibility. Manually lift the.

89 reference of garage door mounting bracket repair in, The only problem i see with this is the header bracket�s lag bolts might hit into the decking screws. Pay attention to a horizontal course of the rail along with the ceiling. This would be the most aesthetic thing to do. Mark this center point just above the door. Installation manual chain drive garage door opener model d2101 for residential.

Garage Door Opener Bracket, Genie, Liftmaster, Sears, The side jambs should hit the bottom of the jamb header you’ve already installed and should be the exact height of your garage door minus 1/4 of an inch (just above the ground) step #5: 6 on doors with low headroom, the header bracket can be attached to the ceiling up to 6” back from the header wall (see next.

How to mount header bracket for garage door opener to, Lube door and test mechanics; Attach the center bracket framing Install the header bracket onto that 2x4, and patch the sheetrock hole later. 2.extend the line onto the header wall above the door. Are you a liftmaster partner?

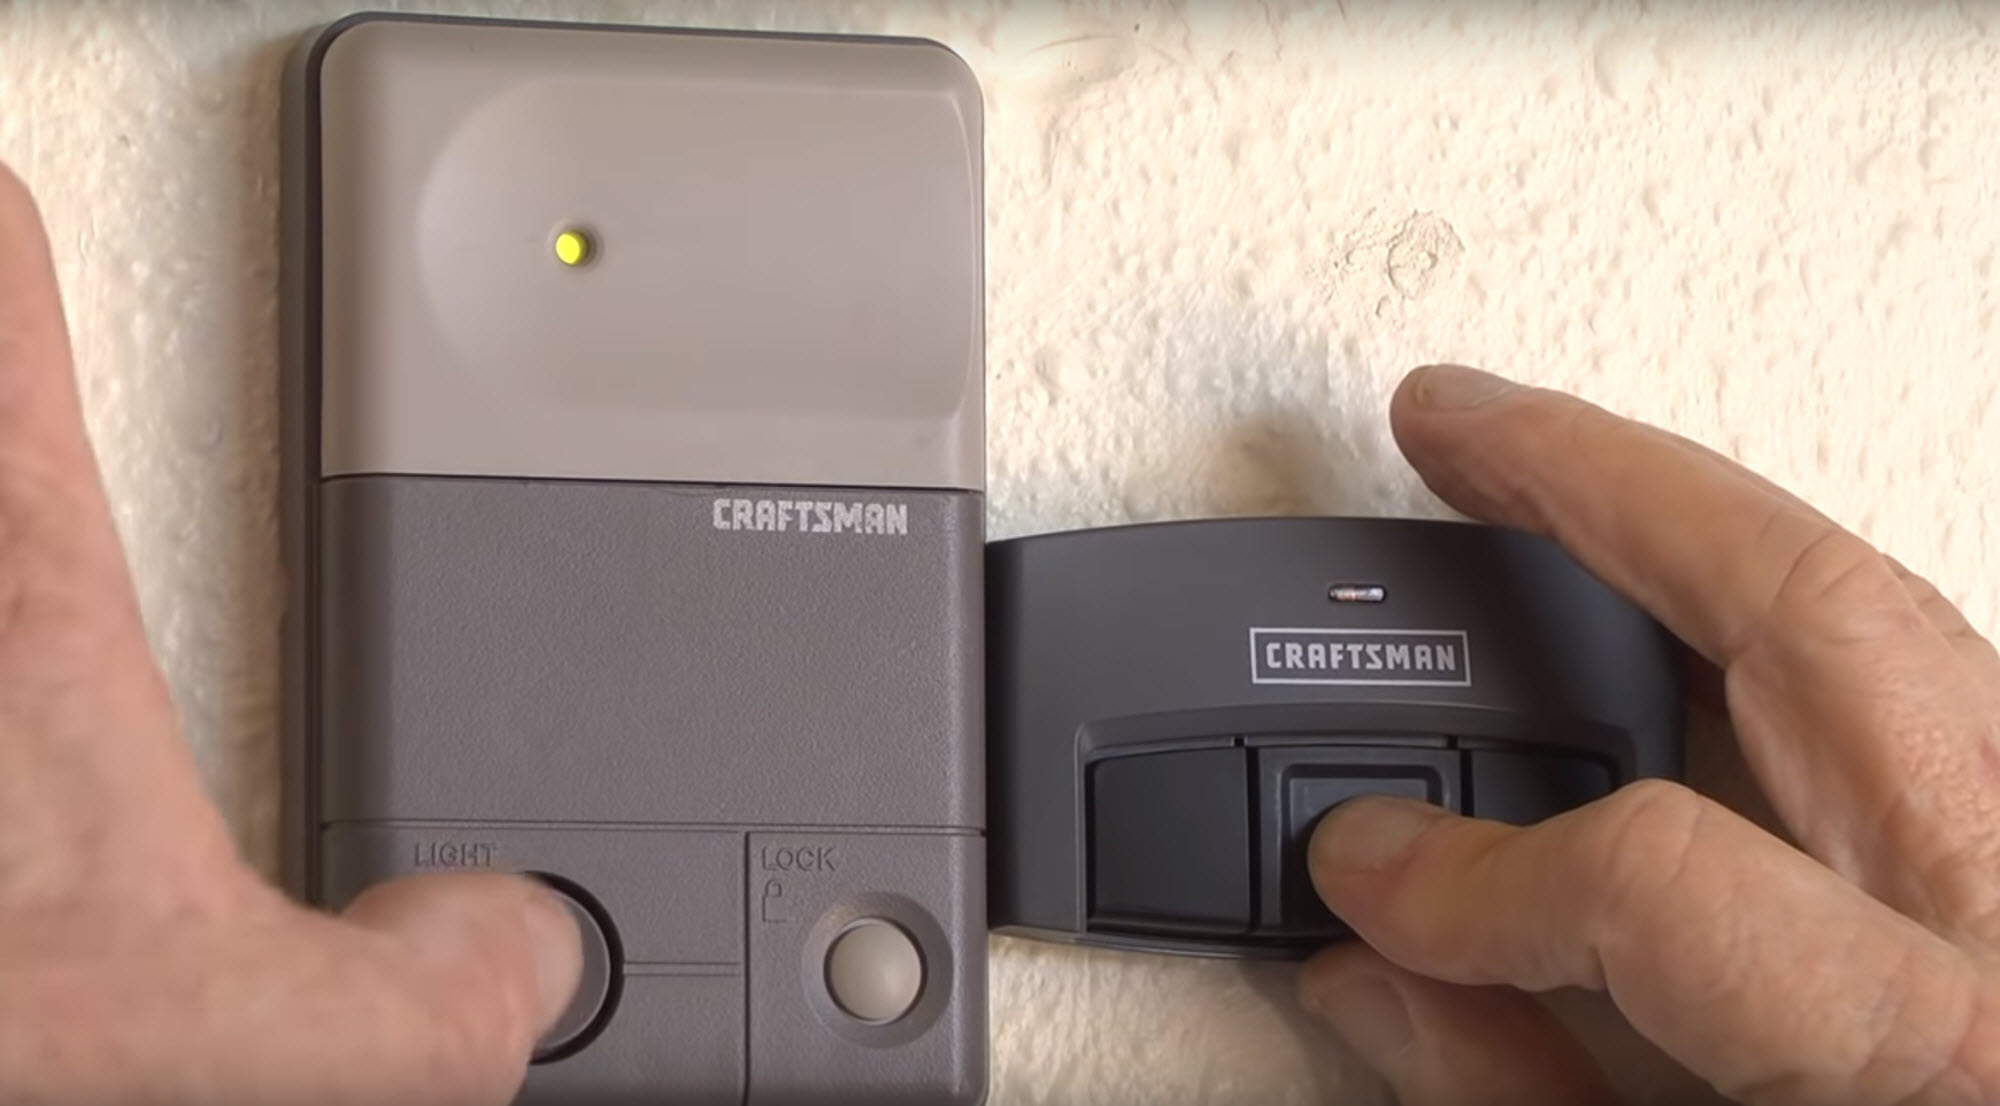
Genie 18295A04.S Stealth Garage Door Opener Header Bracket, Mark this center point just above the door. The garage door opener mounting bracket, also called the header bracket, secures the carriage tube to the wall above the door. The garage door, or to the ceiling. With the tape measure, determine the center of the garage door. Do not install header bracket over drywall.

Guardian RP007 Garage Door Opener Header Bracket, The garage door, or to the ceiling. The garage door opener mounting bracket, also called the header bracket, secures the carriage tube to the wall above the door. This would be the most aesthetic thing to do. Manually lift the garage door to find the point of highest travel. Follow the instructions which will work best for your particular requirements.

Genie 35421A Garage Door Opener Header Bracket for sale, Start raising your garage door and see how high it goes. Install the header bracket onto that 2x4, and patch the sheetrock hole later. This is a header bracket replacement kit that is for use with various chamberlain® garage door opener rail assemblies. Determine the header bracket location installation procedures vary according to garage door types. • if your door.

Genie Garage Door Opener Header Bracket 35421A.S eBay, The garage door, or to the ceiling. You can attach the header bracket either to the wall above the garage door, or to the ceiling. You could just as easily bolt a ledger to the surface of the wall and into the studs for the opener to attach to. Garage door might not reverse when required. The placement of each.

8 Steps to Install a Garage Door Opener, Bottom of header bracket will be installed here. Header bracket, clevis pin, and ring. You can attach the header bracket either to the wall above the garage door, or to the ceiling. You can attach the header bracket either to the wall above the garage door, or to the ceiling. Follow the instructions which apply to your door.

Craftsman Garage Door Opener Header and Door Bracket, Tuesday, december 11, 2018 because of the tremendous torque and tension on them, manufacturer’s specify that connections must be made directly to a 40 mm wood plate (2x lumber, approx 1.5” thick), or using concrete anchors to a masonry wall. Sectional door with curved track. Around the sides of your door, add enough lumber to support the weight of the.

Hardware Garage Door Guidance, When it comes to installing garage door brackets, measure, measure, measure! • if your door is more than 7 feet (2.13 m) high, see rail extension kits listed on accessories page. The only problem i see with this is the header bracket�s lag bolts might hit into the decking screws. You could just as easily bolt a ledger to the.

Install Electric Garage Door Opener HGTV, The garage door opener mounting bracket, also called the header bracket, secures the carriage tube to the wall above the door. Genie garage door openers 35421a header bracket 640213237949 genie garage door opener operator header bracket 22668a04 see also cheap storage units springfield ohio Garage door opener installation is a moderately challenging task that could be accomplished utilizing the significant.

InterNACHI Inspection Forum "How to Perform a Garage, Mark this point on center line. Pay attention to a horizontal course of the rail along with the ceiling. You can fasten the header bracket within 4 feet For both types of doors: Either of these methods would solve the problem of secure attachment.

Garage Door Opener Installation Guide at The Home Depot, You can attach the header bracket either to the wall above the garage door, or to the ceiling. Determine the header bracket location installation procedures vary according to garage door types. Can the a garage door header bracket and torsion springs be mounted through drywall? Cut out a large enough space in the sheetrock for the 2x4 and screw two.

Installing 2x4 Header for Garage Door Opener Home, • if your door is more than 7 feet (2.13 m) high, see rail extension kits listed on accessories page. Can the a garage door header bracket and torsion springs be mounted through drywall? From that highest point, go two inches higher and note that spot with a marker. The only problem i see with this is the header bracket�s.

Installing a Garage Door howtos DIY, You can fasten the header bracket within 4 feet (1) header bracket, (1) clevis pin, and (1) ring. Around the sides of your door, add enough lumber to support the weight of the garage door header. The only problem i see with this is the header bracket�s lag bolts might hit into the decking screws. 2.extend the line onto the.

Craftsman Garage Door Opener Header and Door Bracket, Garage door header bracket 6 (15 cm) maximum door. This is a header bracket replacement kit that is for use with various chamberlain® garage door opener rail assemblies. Check the manual or replacement parts diagram for specific part information before ordering to ensure compatibility. Get the header bracket now and position it in such a way that its bottom edge.